
If you grew up watching your grandma can tomatoes, green beans, peaches, jam, or jars of mysterious things that somehow lasted all winter, home canning can feel both familiar and intimidating. You may remember the jars lined up on towels, the giant pot steaming on the stove, and the satisfying ping of lids sealing — but nobody ever actually taught you what was happening.
This guide is for you.
You do not need to come from a family of canners. You do not need a huge garden. You do not need to memorize every processing time. What you do need is a basic understanding of how canning works, the right equipment, and the willingness to follow a tested recipe exactly where safety matters.
By the end of this beginner’s guide, you should understand the difference between water-bath and pressure canning, what equipment you actually need, how to fill and process jars, what headspace means, how altitude changes processing, how to tell whether a jar sealed, what to do if it did not, and which old-fashioned canning practices are no longer recommended.
Important: This article is an educational beginner’s guide, not a substitute for a tested canning recipe. For actual processing times, pressures, jar sizes, acidification, and ingredient proportions, use a current recipe from the National Center for Home Food Preservation, USDA guidance, or your university Extension service.
What Is Home Canning, Really?
At its simplest, canning is a way of preserving food in a sealed glass jar by applying enough heat for a specific amount of time to destroy microorganisms that could cause spoilage or illness. As the jar cools, a vacuum forms and pulls the lid down tightly against the rim.
That vacuum seal is important, but here is something every beginner needs to understand:
A sealed jar is not automatically a safely canned jar.
A jar can seal even if the food inside was processed incorrectly. Safety comes from using the correct recipe, preparation method, jar size, processing time, temperature or pressure, and altitude adjustment — not simply from hearing the lid “ping.”
The #1 Rule of Safe Canning: Use a Tested Recipe
If you remember nothing else from this article, remember this:
Home canning is not the place to improvise processing instructions.
You can season many foods after opening the jar. You can change some optional ingredients when a tested recipe specifically says you can. But you should not take a random family recipe, put it in jars, guess at a processing time, and assume that pressure canning “long enough” will make it safe.
Why? Because heat moves through different foods at different rates. Thickness, acidity, density, jar size, ingredient ratios, and packing method all affect how quickly the coldest part of the jar reaches a safe temperature.
The National Center for Home Food Preservation recommends using research-tested recipes from reliable sources such as USDA, NCHFP, and university Extension programs.
Water-Bath Canning vs. Pressure Canning
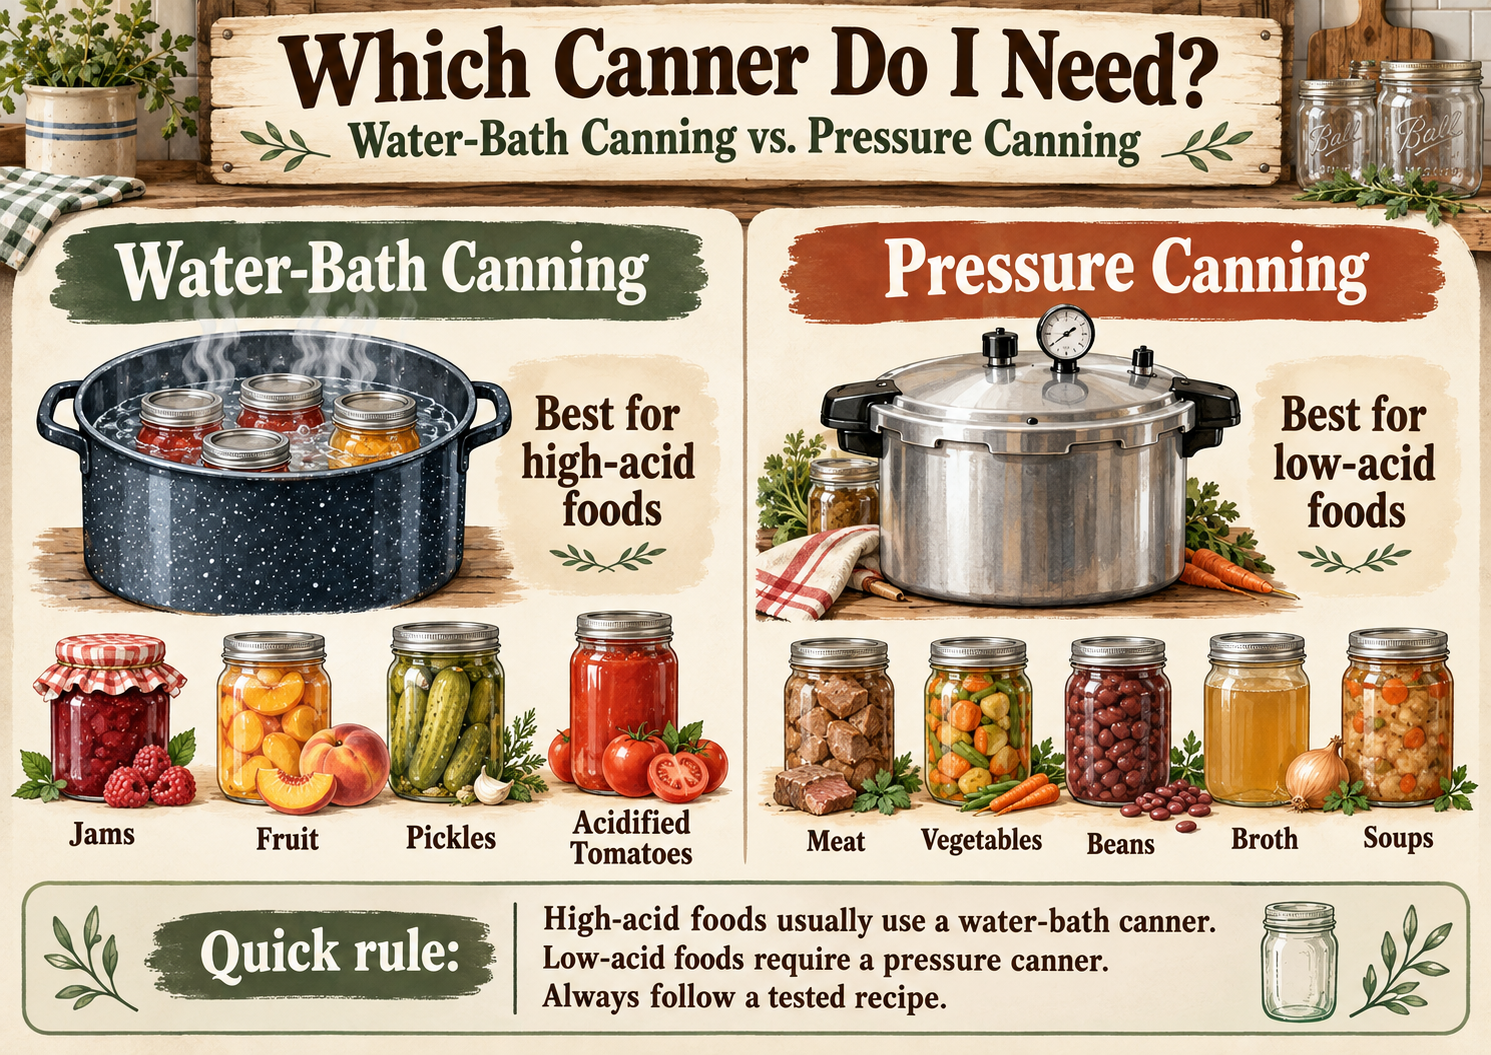
This is the first big decision beginners need to understand.
| Method | Used For | Examples | How It Works |
|---|---|---|---|
| Boiling-water bath canning | High-acid or properly acidified foods | Most fruits, jams, jellies, pickles, tested salsas, properly acidified tomatoes | Jars are completely covered with boiling water and processed for a tested amount of time. |
| Pressure canning | Low-acid foods | Plain vegetables, meat, poultry, seafood, beans, broth, and many soups | Steam under pressure raises the temperature above boiling-water temperature so low-acid foods can be processed safely. |
Low-acid foods require pressure canning because boiling water alone cannot reach the temperatures needed to safely process them in a practical home-canning time. The NCHFP explains that low-acid foods must be processed in a pressure canner to address the risk of botulism.
If you want ideas for foods that are especially useful to pressure can, see my guide to 25 Best Foods to Pressure Can.
So Where Do Tomatoes Fit?
If your garden is producing faster than you can keep up, I also put together 25 Things to Do With Too Many Tomatoes, with ideas for using and preserving a heavy tomato harvest.
Tomatoes confuse a lot of beginners because Grandma may have treated them like a high-acid food. Modern tested recipes commonly require acidification of whole, crushed, or juiced tomatoes, even when a pressure-canning option is given.
For example, current NCHFP directions call for adding bottled lemon juice or citric acid in specified amounts to ensure safe acidity. Follow the exact tested tomato recipe you are using. You can read the NCHFP tomato acidification directions here.
Do You Need a Pressure Canner and a Water-Bath Canner?
Not necessarily.
A water-bath canner is essentially a deep pot with a rack that is tall enough to cover jars with at least 1 inch of boiling water during processing — and 2 inches for longer processing times. You may already own a pot that can safely do that.
A pressure canner is specialized equipment. It is not the same thing as a small pressure cooker, and USDA processes should not be assumed safe in an electric multi-cooker such as an Instant Pot-style appliance. USDA-style pressure-canning processes were developed for stovetop pressure canners large enough to hold at least four quart jars standing upright.
If you plan to can vegetables, meat, beans, broth, or other low-acid foods, a true pressure canner is worth buying.
Affiliate disclosure: This post contains affiliate links. As an Amazon Associate, I earn from qualifying purchases. If you purchase through one of my links, I may earn a commission at no additional cost to you.
I highly recommend the pressure canner I use. It comes with two racks, and I love how versatile it is: I can use it as a pressure canner, a huge stockpot, or a boiling-water bath canner. That means one big piece of equipment can handle pressure canning, water-bath canning, and jobs like cooking down a large batch of tomatoes during harvest season.
Beginner Canning Equipment: What You Actually Need
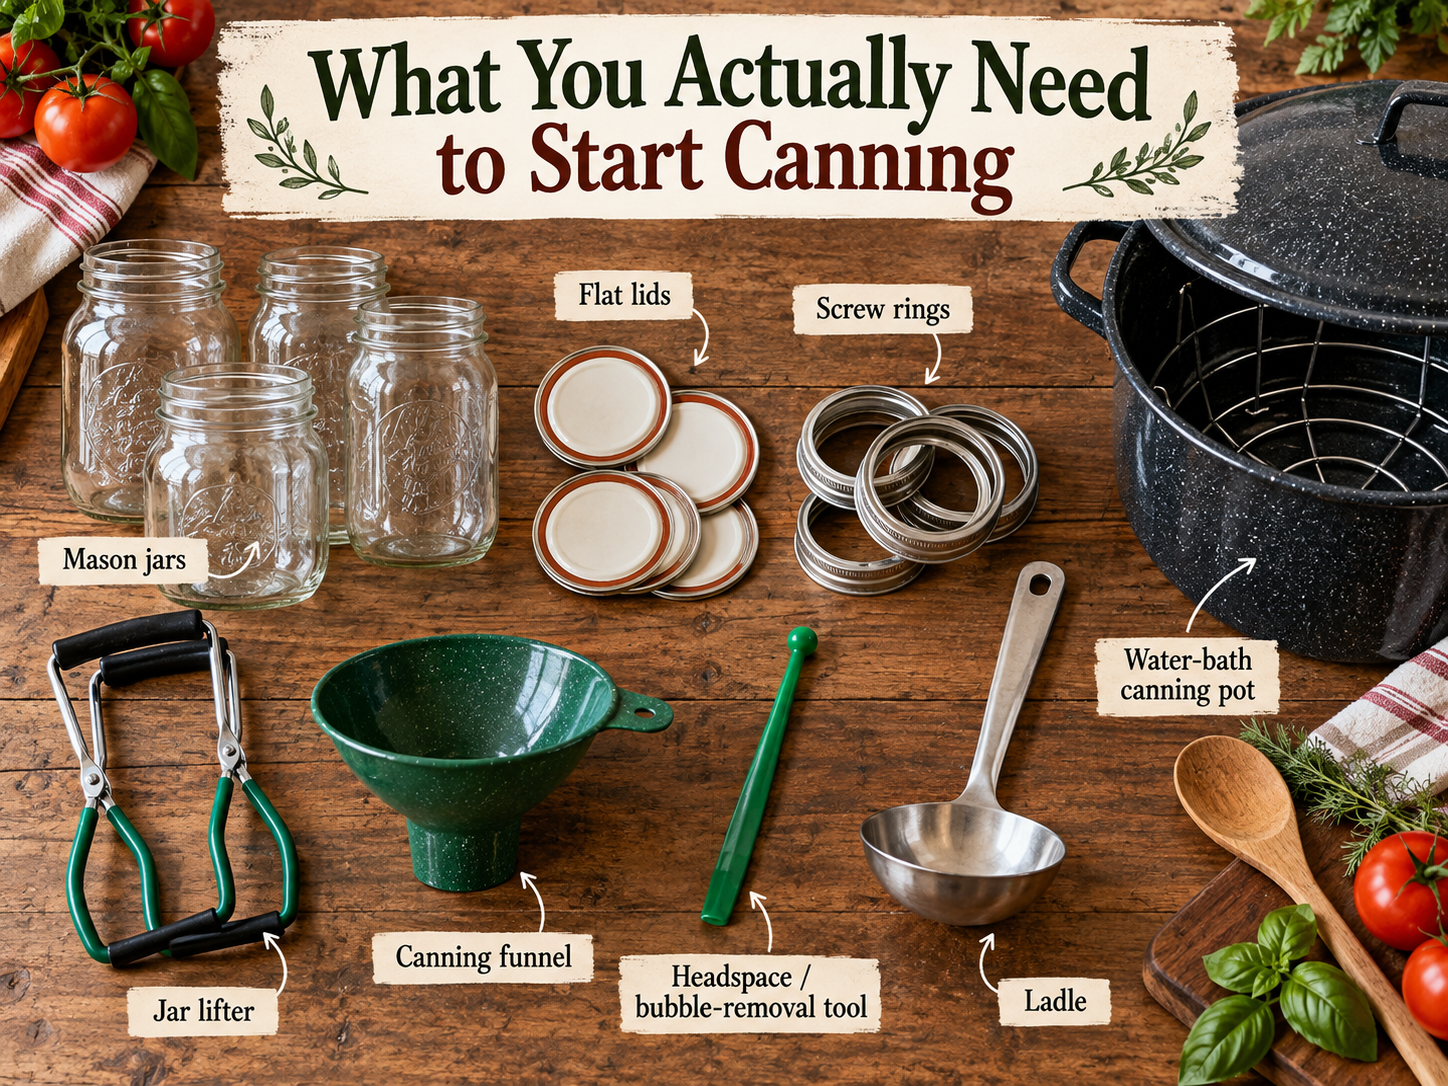
You can buy elaborate canning kits, but the basics are surprisingly simple.
Essential Canning Supplies
- Mason-style canning jars in the size required by your tested recipe
- New flat canning lids for standard two-piece metal lid systems
- Reusable screw bands/rings in good condition
- Water-bath canner or deep stockpot with a rack for high-acid foods
- Pressure canner for low-acid foods
- Jar lifter
- Canning funnel
- Bubble remover/headspace tool
- Ladle
- Clean towels or a cooling rack
- Timer
- Measuring spoons and cups
- A current tested recipe
Recommended Canning Supplies
If you are building your canning setup from scratch, these are useful supplies to have on hand:
- Pressure canner with two racks — this is the one I use and recommend because it also works as a huge stockpot and water-bath canner.
- Regular-mouth canning jar lids
- Wide-mouth canning jar lids
- Regular-mouth bands
- Wide-mouth bands
- Reusable regular-mouth canning lids — I actually love reusable lids and prefer to use them when I can.
- Reusable wide-mouth canning lids
- Canning supplies starter kit — a convenient option if you need a jar lifter, tongs, jar wrench/spanner, funnel, bubble/headspace tools, lid lifter, measuring spoons, canning rack, and other basics.
- Kitchen scale — useful for recipes that measure produce or ingredients by weight.
You do not have to buy every tool individually on day one. A basic starter kit plus the correct canner for the foods you plan to preserve can cover most beginner projects.
Nice-to-Have Supplies
- Extra jars and lids
- A magnetic lid wand if you like using one
- Large stainless-steel stockpot
- Food mill for tomato sauce or juice
- Labeling tape or jar labels
- Permanent marker
- Kitchen scale for recipes that use weight
What Kind of Jars Should You Use?
Use jars manufactured for home canning. Standard Mason-type canning jars are designed to withstand repeated heating and cooling. Inspect every jar before using it.
Do not use jars with:
- Cracks
- Chips around the rim
- Deep scratches
- Damaged sealing surfaces
Jars themselves can be reused many times when they remain in good condition.
Can You Reuse Canning Lids?
I personally prefer reusable canning lids and use them often. If you want to try them, these are the reusable regular-mouth lids and reusable wide-mouth lids I recommend. Reusable lid systems work differently from standard disposable two-piece lids, so always follow the manufacturer’s instructions for preparing, tightening, processing, and checking the seal.
For the common two-piece metal lid system, the flat lid is designed for one-time canning use. Screw bands may be reused as long as they are not badly rusted, warped, or damaged.
If you use a reusable lid system, follow that manufacturer’s instructions instead.
Do Canning Jars Have to Be Sterilized First?
Not always.
According to NCHFP guidance, empty jars do not need to be pre-sterilized when the filled jars will be processed in a pressure canner, or when certain fruits, tomatoes, pickled foods, or fermented foods will be processed for at least 10 minutes in a boiling-water canner.
When a tested boiling-water recipe has a processing time of less than 10 minutes, the recipe may require pre-sterilized jars.
Either way, start with clean jars and follow the recipe you are using.
Canning Vocabulary Beginners Need to Know
Headspace
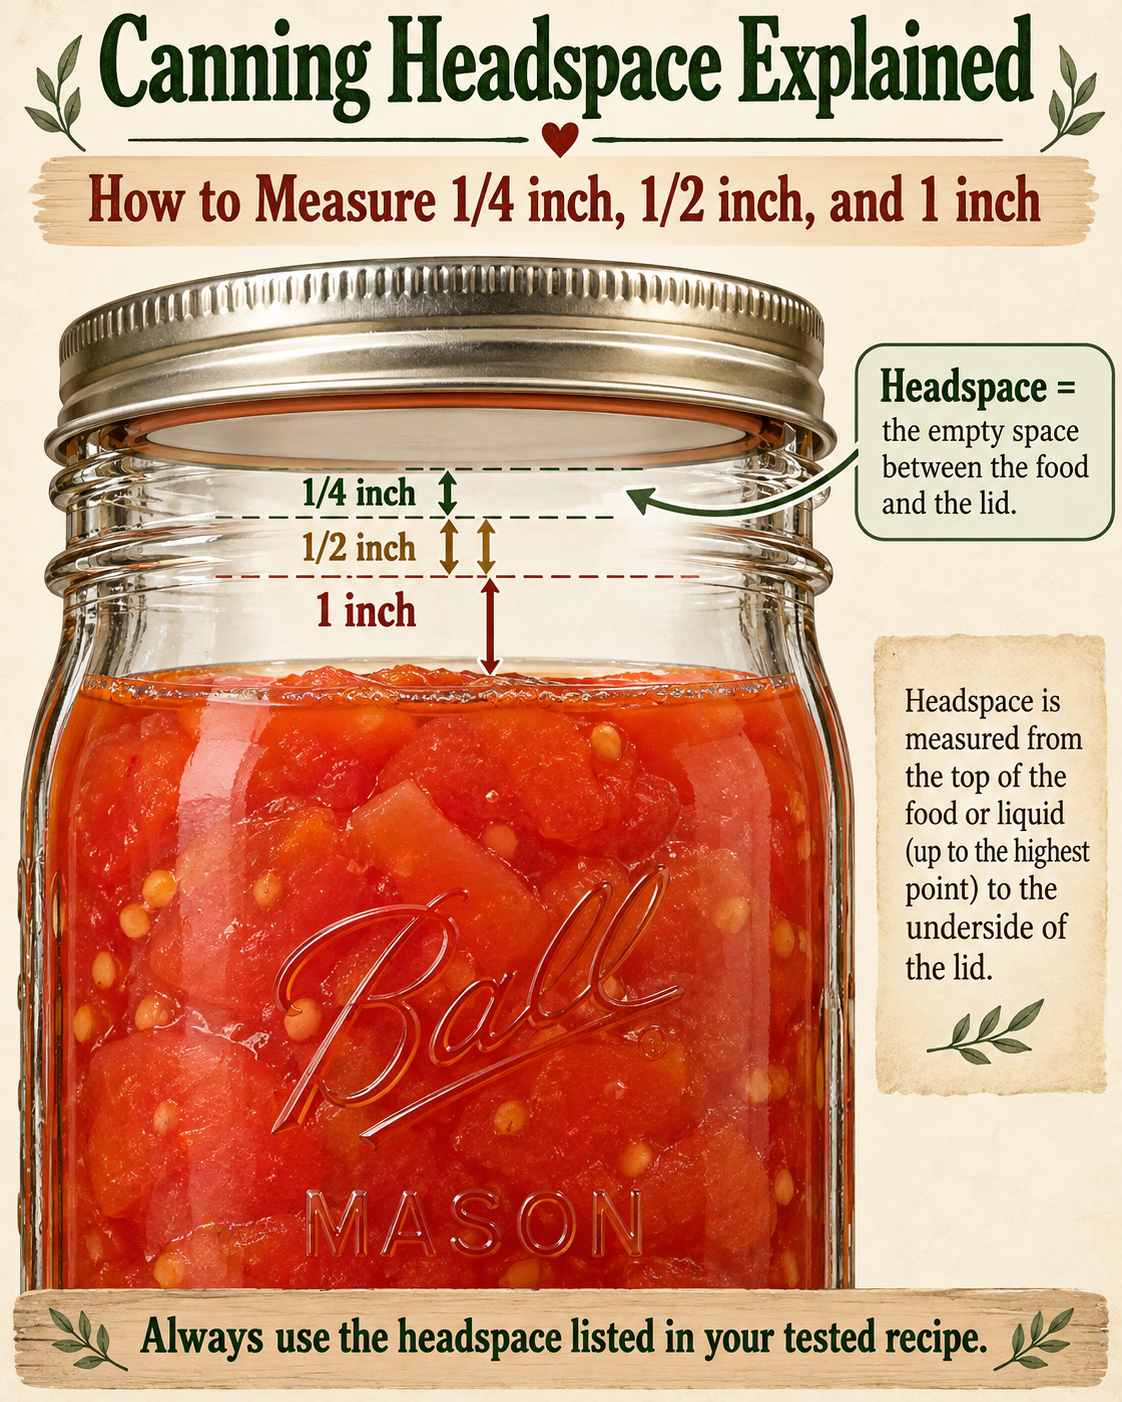
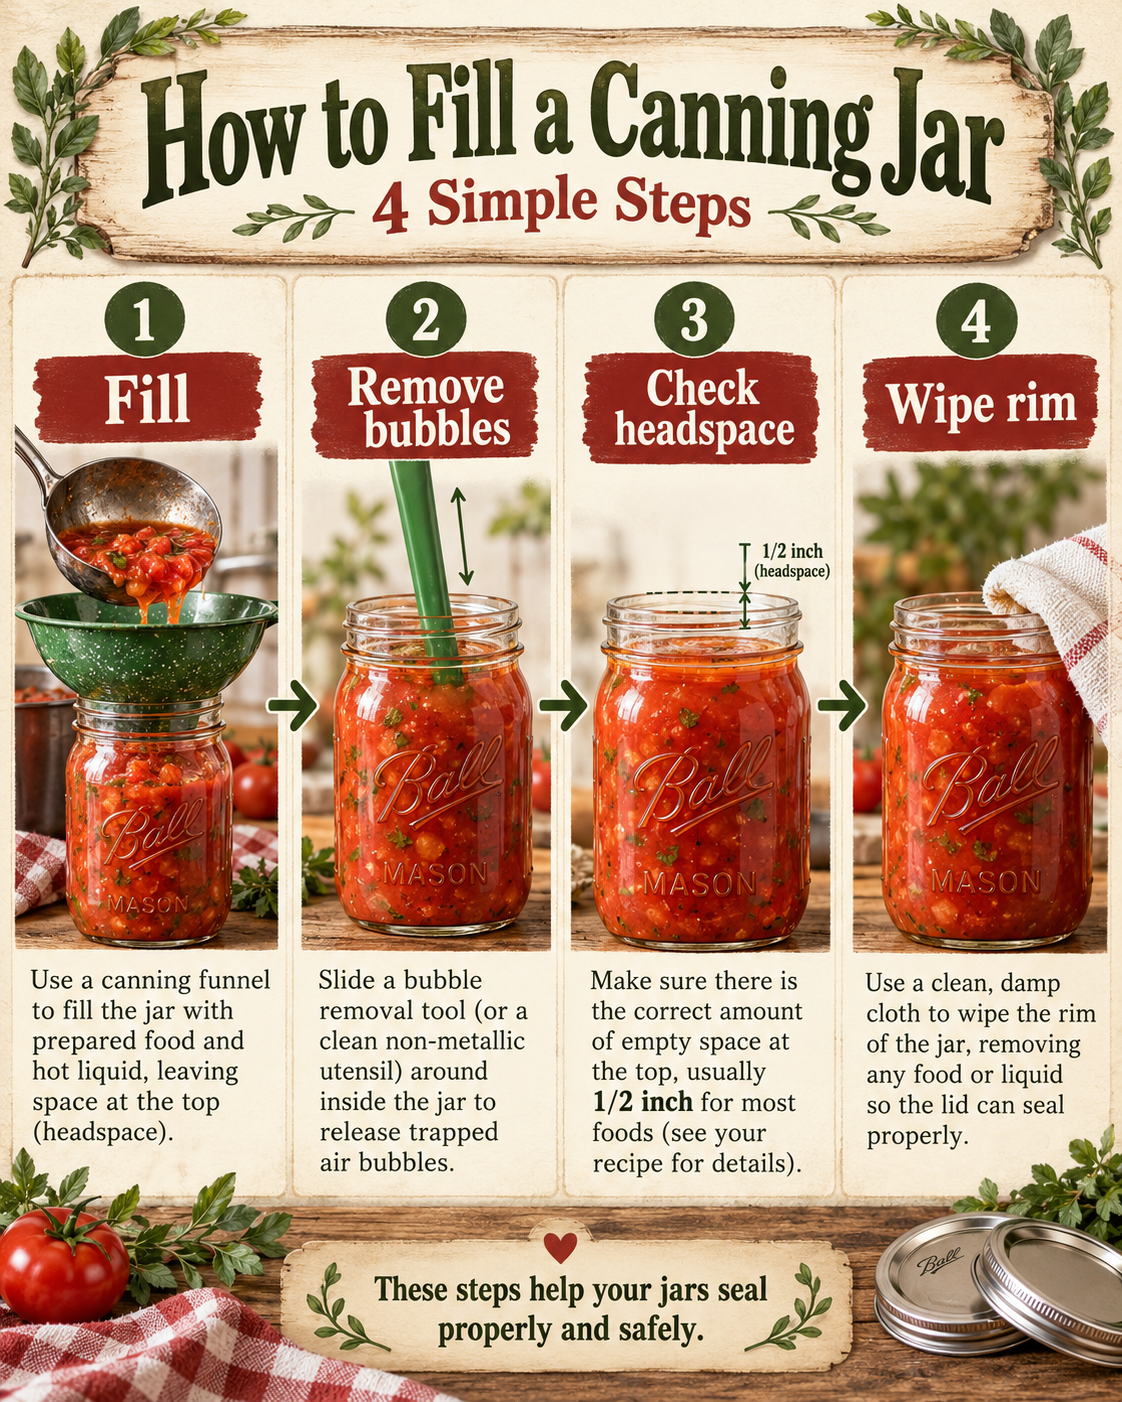
Headspace is the empty space between the top of the food or liquid and the underside of the lid.
It is not random empty space. It gives food room to expand during processing and helps the jar form a proper vacuum as it cools.
Common headspace amounts include approximately:
- 1/4 inch for many jams and jellies
- 1/2 inch for many fruits and tomatoes
- 1 to 1 1/4 inches for many low-acid pressure-canned foods
Those are examples only. Always use the headspace listed in the tested recipe.
Raw Pack
Raw packing means placing uncooked or unheated food into jars and then adding hot liquid when the tested recipe calls for it.
Hot Pack
Hot packing means heating the food before putting it into jars. For many foods, hot packing helps remove air from the food, improves packing, and may produce better quality during storage.
Debubbling
After filling a jar, air bubbles can become trapped around food. Run a plastic or nonmetallic bubble-removal tool around the inside of the jar according to the recipe, then recheck the headspace and add liquid if needed.
Fingertip Tight
When using standard two-piece lids, the screw band should be tightened according to the lid manufacturer’s directions — secure, but not cranked down as hard as possible. Air needs to be able to escape during processing so the vacuum can form as the jar cools.
Siphoning
Siphoning is liquid escaping from a jar during or immediately after processing. It can happen when pressure changes too quickly, jars are tilted, headspace is incorrect, or the canner is cooled improperly.
A small amount of liquid loss does not automatically mean the jar is unsafe if the jar sealed and the correct tested process was followed. Do not open the jar to replace lost liquid.
How to Fill a Canning Jar
How to Water-Bath Can: The Basic Process
This is the method many people remember from childhood. It is appropriate only for foods and recipes specifically tested for boiling-water canning.
- Read the entire recipe first. Check the jar size, processing time, pack style, headspace, and altitude adjustment before you start.
- Put the rack in the canner and begin heating the water. You need enough water to cover the filled jars by at least 1 inch during processing. For longer processes, the tested guidance may call for 2 inches.
- Prepare the food exactly as directed. Chop, peel, heat, acidify, or pack as the recipe instructs.
- Fill hot jars. Use a canning funnel and leave the required headspace.
- Remove bubbles if the recipe calls for it. Recheck headspace afterward.
- Wipe the rims. Food residue on the sealing surface can cause a seal failure.
- Apply lids and bands. Follow the lid manufacturer’s preparation and tightening directions.
- Load jars upright into the canner. Keep them on the rack, not sitting directly on the pot bottom.
- Bring the water to a vigorous boil. Start the processing timer only when the water is boiling as directed.
- Maintain the boil for the entire processing time. If the water stops boiling, bring it back to a vigorous boil and restart the processing time from the beginning.
- When processing is complete, turn off the heat and remove the lid. Current NCHFP boiling-water canner directions call for waiting 5 minutes before removing the jars.
- Lift jars straight up and keep them upright. Place them on a towel or cooling rack with space between them.
- Leave them alone for 12 to 24 hours. Do not press the lids, tighten the bands, or tip the jars while they cool.
See the full NCHFP boiling-water canner instructions before your first batch.
How to Pressure Can: The Basic Process
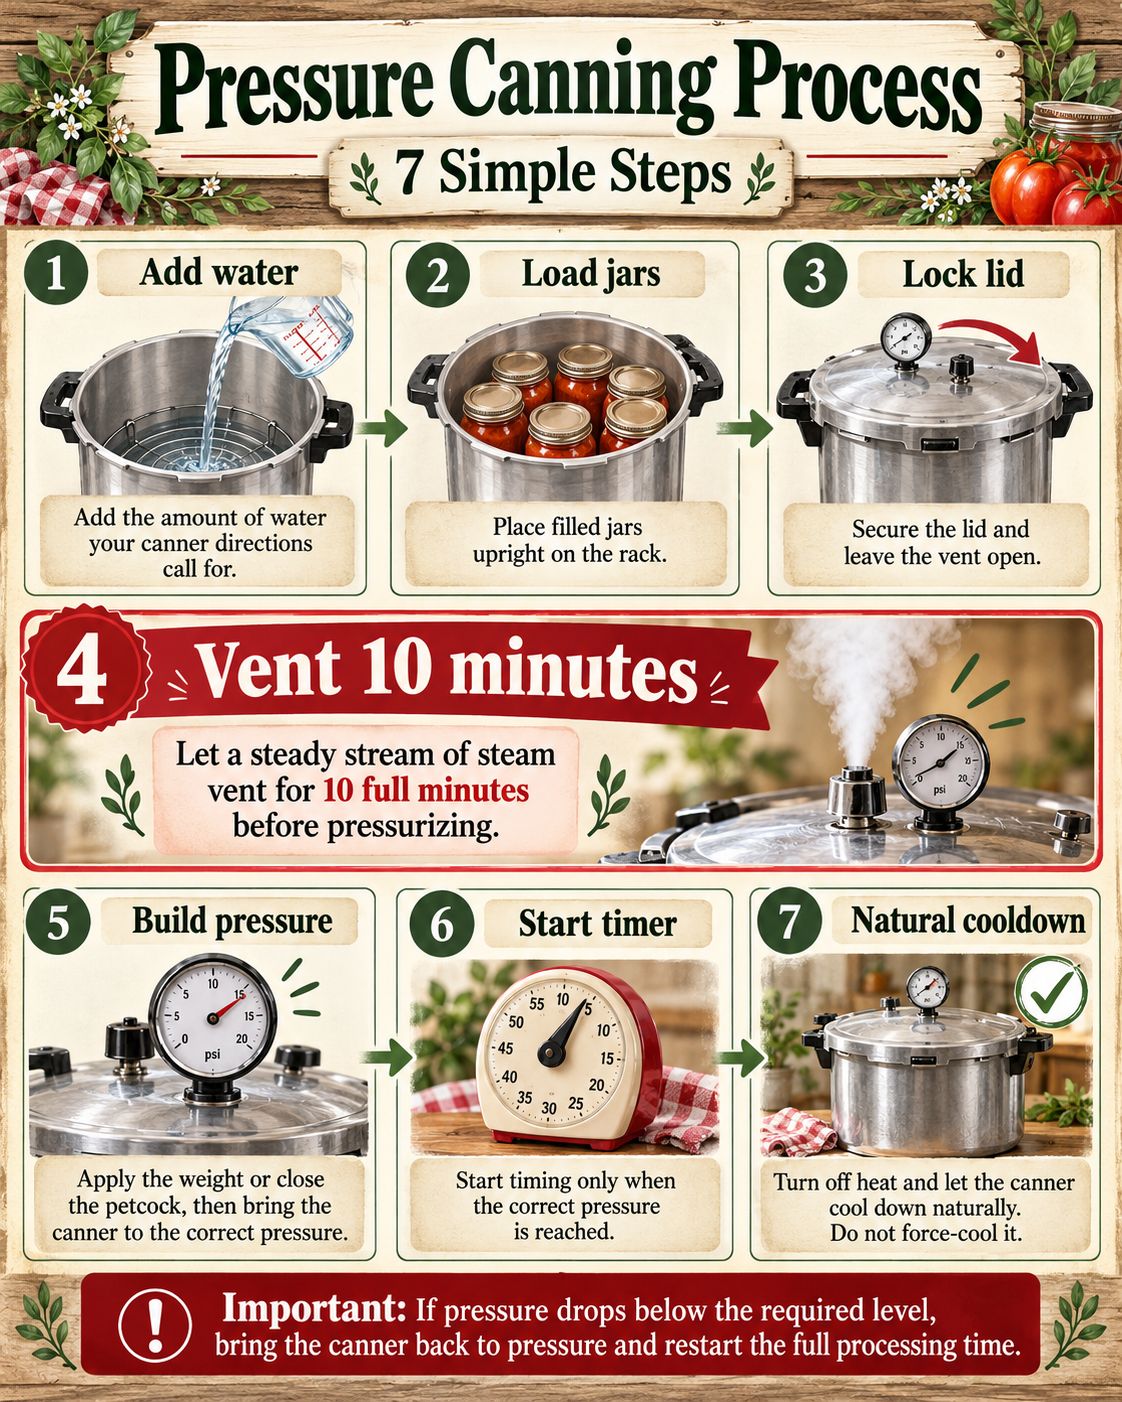
Pressure canning looks more intimidating because there is a gauge, vent, steam, and pressure involved. Once you understand the sequence, it becomes much less mysterious.
Always read your canner manufacturer’s manual and follow the tested food recipe.
- Inspect the canner. Make sure the vent is clear, the gasket and safety parts are in good condition, and the canner sits level on the burner.
- Add the rack and the amount of water specified by the recipe or canner directions. Standard NCHFP guidance commonly begins with about 2 to 3 inches of water unless the recipe specifies otherwise.
- Prepare and fill your jars according to the tested recipe.
- Place jars upright on the rack.
- Lock the canner lid. Leave the vent pipe uncovered or petcock open.
- Heat on high until a strong, continuous funnel of steam escapes from the vent.
- Vent continuously for 10 full minutes. This step is essential because trapped air can lower the temperature achieved at a given pressure.
- After venting, apply the weight or close the petcock as your canner requires.
- Allow the canner to reach the pressure required by your recipe and altitude.
- Start the processing timer only after the correct pressure has been reached.
- Maintain pressure for the full processing time. Avoid large pressure swings.
- If the pressure drops below the required amount, bring the canner back to pressure and restart the entire processing time from the beginning.
- When processing is complete, turn off the heat and let the canner cool naturally. Do not run cold water over it. Do not force the vent. Do not remove the weight early.
- Wait until the canner is completely depressurized. Follow your manufacturer’s indicators and instructions.
- After depressurization, remove the weight or open the petcock and wait 10 minutes before opening the lid.
- Open the lid away from your face. Steam can cause serious burns.
- Remove jars upright and allow them to cool undisturbed for 12 to 24 hours.
Before your first pressure-canning session, read the full NCHFP guide to using pressure canners.
Dial-Gauge vs. Weighted-Gauge Pressure Canners
A pressure canner may use a dial gauge, a weighted gauge, or a combination of the two.
Dial gauge: You monitor a numbered dial and regulate the burner to keep the canner at or slightly above the required pressure.
Weighted gauge: A calibrated weight regulates pressure and usually rocks or jiggles in a specific way. Follow your canner manufacturer’s directions for what that movement should look and sound like.
Dial gauges should be checked for accuracy regularly; NCHFP recommends checking dial gauges each year before use.
Altitude Matters More Than Beginners Realize
Water boils at a lower temperature as elevation increases. That means a processing schedule that is safe near sea level may not be sufficient at a higher elevation unless the time or pressure is adjusted.
If you are at or above 1,000 feet, many boiling-water recipes require additional processing time. Pressure-canning adjustments depend on the canner type and recipe.
Do not guess your adjustment. Look up your elevation and use the altitude chart included with the tested recipe you are following.
Why You Should Not Change Jar Size
If a recipe gives processing times for pints and quarts, use one of those sizes.
Do not assume you can safely put the food into a larger jar and simply process it longer. Heat takes longer to move through a larger volume of food, and there may not be a tested process for that jar size.
Smaller jars can sometimes be used when a tested recipe allows them, but you still use a tested processing schedule rather than inventing your own.
What Happens After the Canner Turns Off?
The canning process is not finished the second the timer beeps.
Once jars are removed, place them upright on a towel or cooling rack with space between them. Then leave them alone.
You may hear the famous ping as lids pull down. Some jars seal quickly. Others may take longer.
Do not:
- Press the lid centers while the jars are still cooling
- Tighten the screw bands
- Turn jars upside down
- Move jars repeatedly
- Put hot jars into the refrigerator
Let them cool undisturbed for 12 to 24 hours.
How Do You Know If a Jar Sealed?
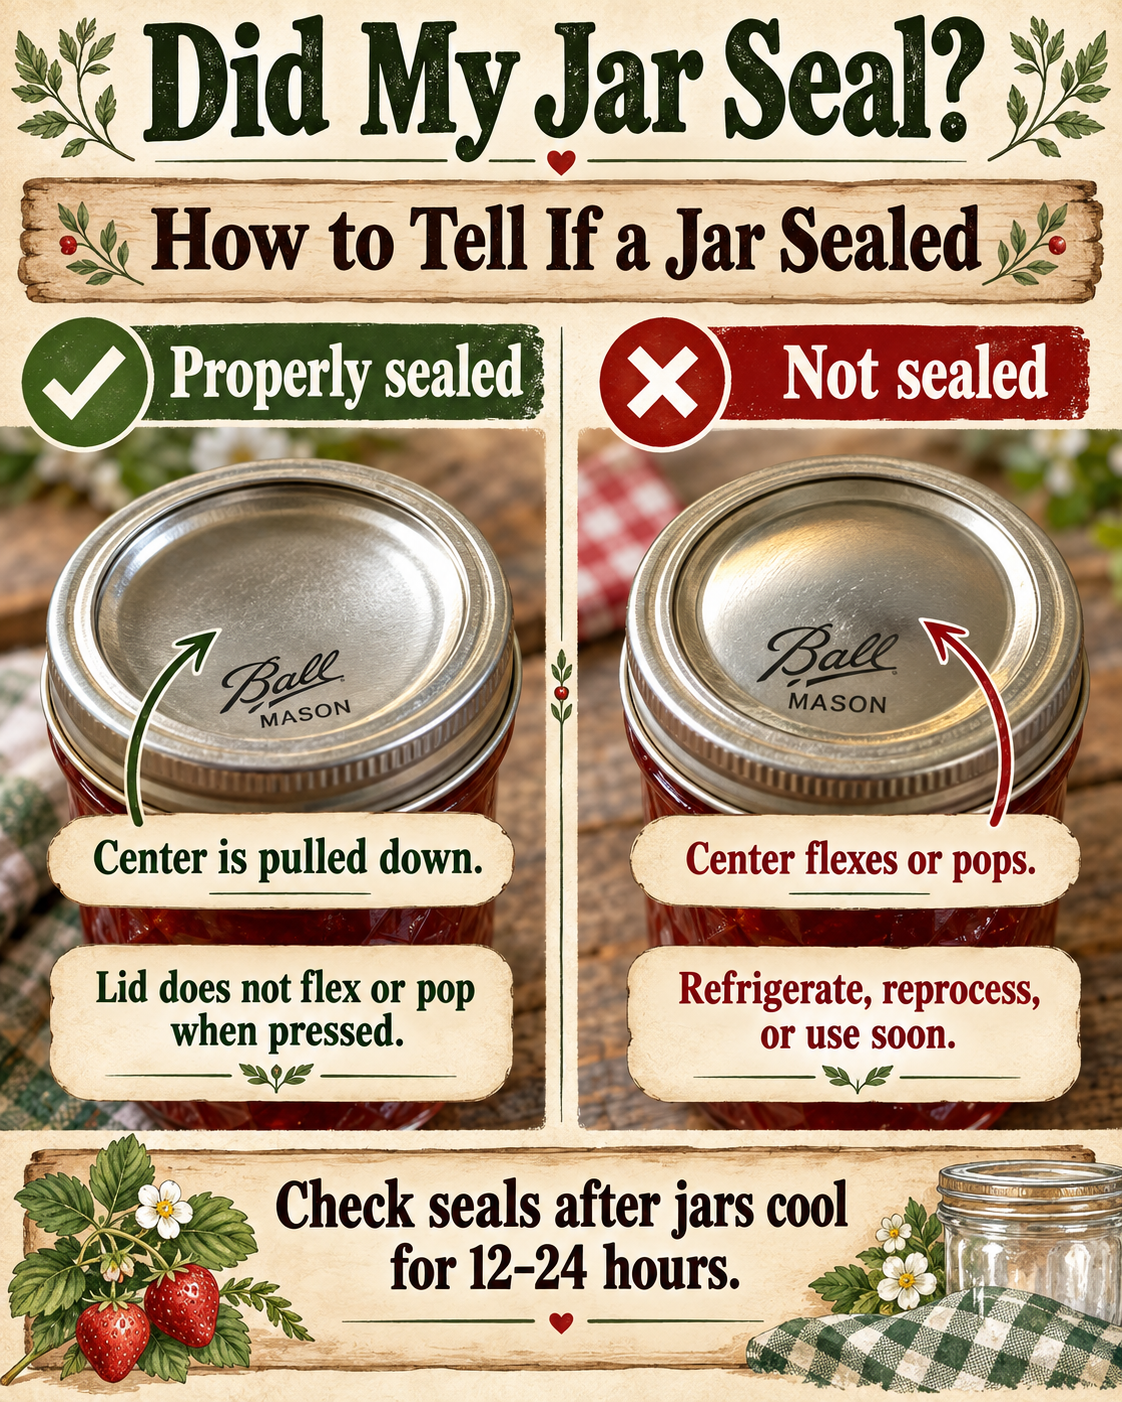
After the jars have cooled for 12 to 24 hours, remove the screw bands and check the seals.
A properly sealed standard metal lid should be pulled slightly downward in the center and should not flex up and down when pressed.
NCHFP also describes visual and sound-based checks, but the easiest beginner check is usually to remove the band and confirm that the lid is firmly vacuum-sealed and concave.
Once a jar has sealed, wash and dry the outside of the jar if needed before storage.
What If a Jar Does Not Seal?
Do not panic. A failed seal happens to experienced canners too.
If you discover the failed seal within 24 hours and you followed an up-to-date tested recipe correctly, you generally have three options:
- Refrigerate it and use it soon.
- Freeze it in an appropriate container or jar with enough freezer headspace.
- Reprocess it according to current tested reprocessing directions.
NCHFP notes that safe reprocessing requires using a tested hot-pack process and a new lid, and it must be done within 24 hours. If your original method was not a tested process, a sealed jar does not make the product safe.
Should You Store Canned Jars With the Rings On?
For standard two-piece lids, I prefer removing the screw bands after the jars have cooled and the seals have been checked.
NCHFP recommends removing bands for storage because this helps keep them from rusting and makes it easier to notice if a seal later fails.
Label each jar with:
- What is inside
- The date canned
- Any useful batch notes
Store jars in a cool, dry, dark location. For best quality, plan to use home-canned food within about one year.
Canning Practices You May Have Seen Grandma Do That Are No Longer Recommended
This part can be uncomfortable because many of us learned food preservation by watching people we love. “But Grandma did it for 50 years” is not the same thing as “research shows this method reliably produces a safe product.”
Food-safety recommendations change as researchers learn more.
1. Open-Kettle Canning
Cooking food, pouring it into hot jars, applying a lid, and stopping there is not a recommended home-canning process. Filled jars need the tested heat-processing step.
2. Oven Canning
Do not process filled jars in a conventional oven. Standard canning jars and tested home-canning processes were not designed for this method.
3. Dishwasher Canning
A dishwasher is not a substitute for a boiling-water or pressure canner.
4. Inverting Jars to “Seal” Them
A jar may appear to seal after being turned upside down, but that is not a substitute for a tested heat-processing method.
5. Using a Small Pressure Cooker Instead of a Pressure Canner
USDA processes were developed for true pressure canners, not small pressure saucepans or generic electric multi-cookers.
6. “Dry Canning” Foods That Were Tested With Liquid
If a canning process was developed with liquid covering the food, do not remove the liquid and assume the same time works. The way heat moves through the jar changes.
You can read more in the NCHFP guide to equipment and methods not recommended for home canning.
Foods You Should Not Just “Make Up” a Canning Recipe For
There are foods and ingredient combinations for which safe home-canning processes are not available. A commercial product existing on the grocery-store shelf does not mean a home version can be safely canned with home equipment.
For example, NCHFP soup directions specifically say not to add noodles, pasta, rice, flour, cream, milk, or other thickening agents before canning. Those can be added after opening the jar.
Pureed or mashed pumpkin and winter squash are also not recommended for home canning under current USDA/NCHFP guidance. Tested directions are available for properly prepared cubes instead.
This is one reason I keep coming back to the same rule: find the tested recipe first, then prepare your food to match that recipe.
What Should a Complete Beginner Can First?
Your first canning project should be boring — in a good way.
Choose something with a straightforward tested recipe and enough time that you are not rushing.
Good beginner options include:
- Jam or jelly using a tested recipe
- Pickled vegetables
- Fruit in syrup, juice, or water using a tested recipe
- Acidified tomato juice or tomatoes
- Simple pressure-canned broth once you are comfortable with your pressure canner
If you have an overload of produce, these posts may also help you figure out what to preserve next:
- 25 Things to Do With Too Many Pears
- What to Do With Banana Peppers: 15 Easy Recipes
- 25 Best Foods to Pressure Can
Your First Canning Day: A Beginner-Friendly Game Plan
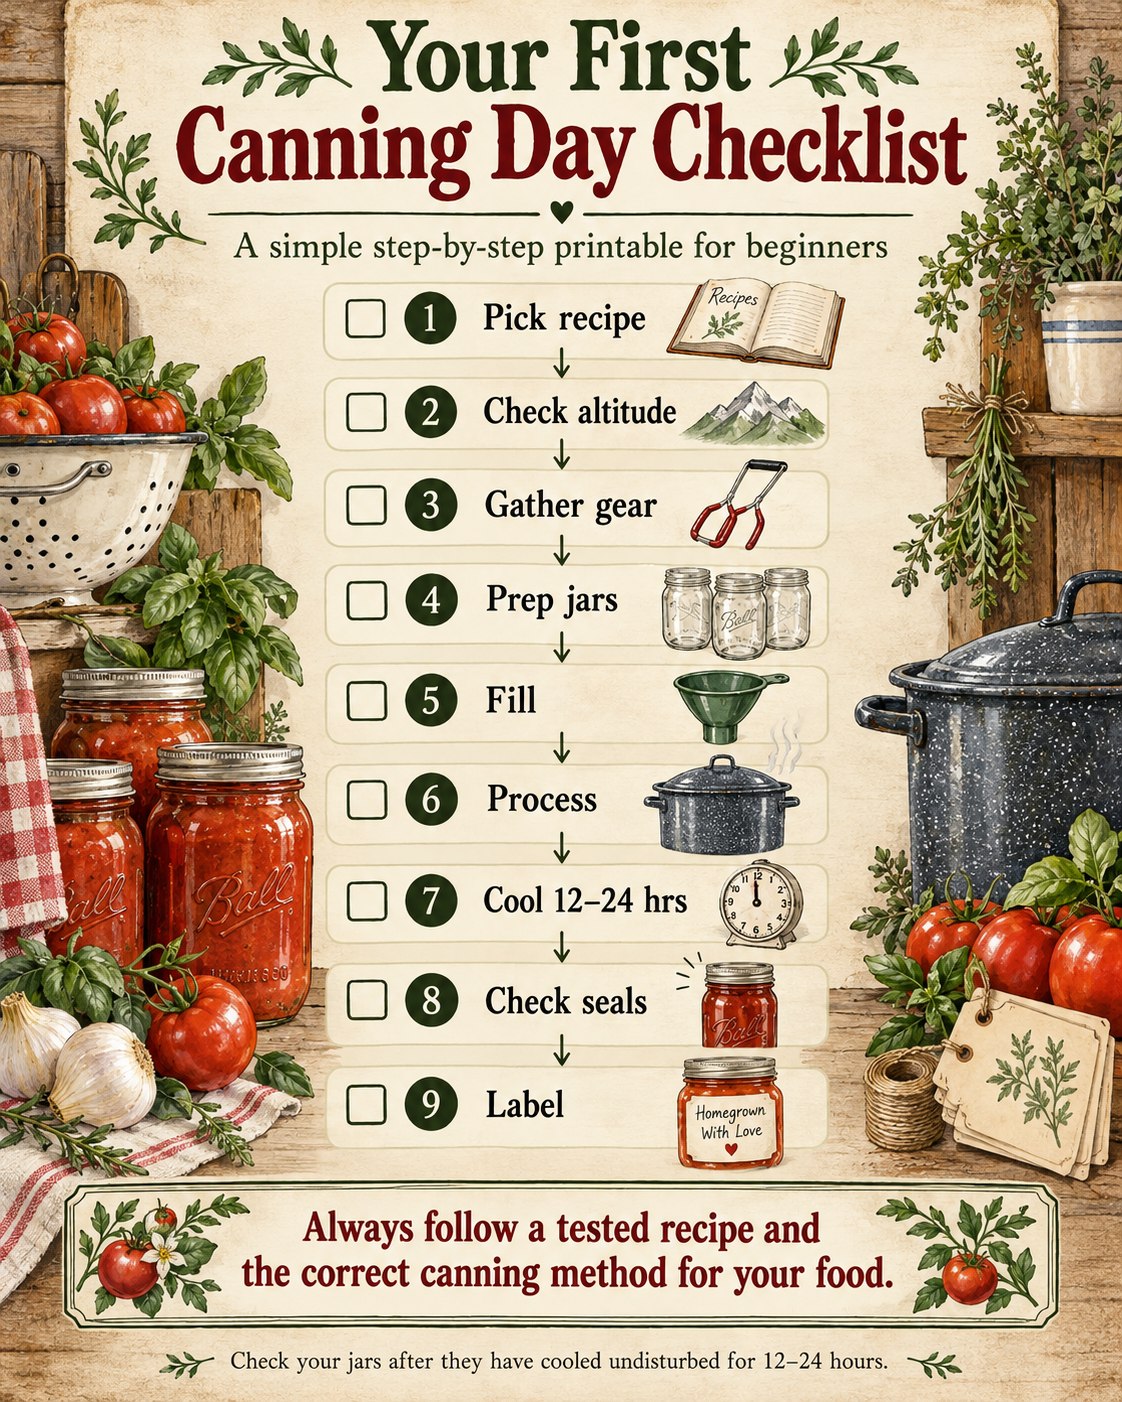
If I were teaching someone who had never canned before, I would have them do this:
- Pick one tested recipe.
- Read it from beginning to end before buying ingredients.
- Confirm whether it needs a water-bath canner or pressure canner.
- Check your elevation and write down the correct processing adjustment.
- Set out every jar, lid, band, tool, and ingredient before you begin.
- Wash the jars and inspect the rims.
- Start heating the canner while preparing the food.
- Fill one jar at a time carefully and consistently.
- Double-check headspace.
- Process for the full tested time.
- Do not rush the cooling stage.
- Check seals the next day, label the jars, and admire them.
The first batch will feel slow. That is normal. By the third or fourth batch, the rhythm starts to make sense.
Beginner Canning Mistakes to Avoid
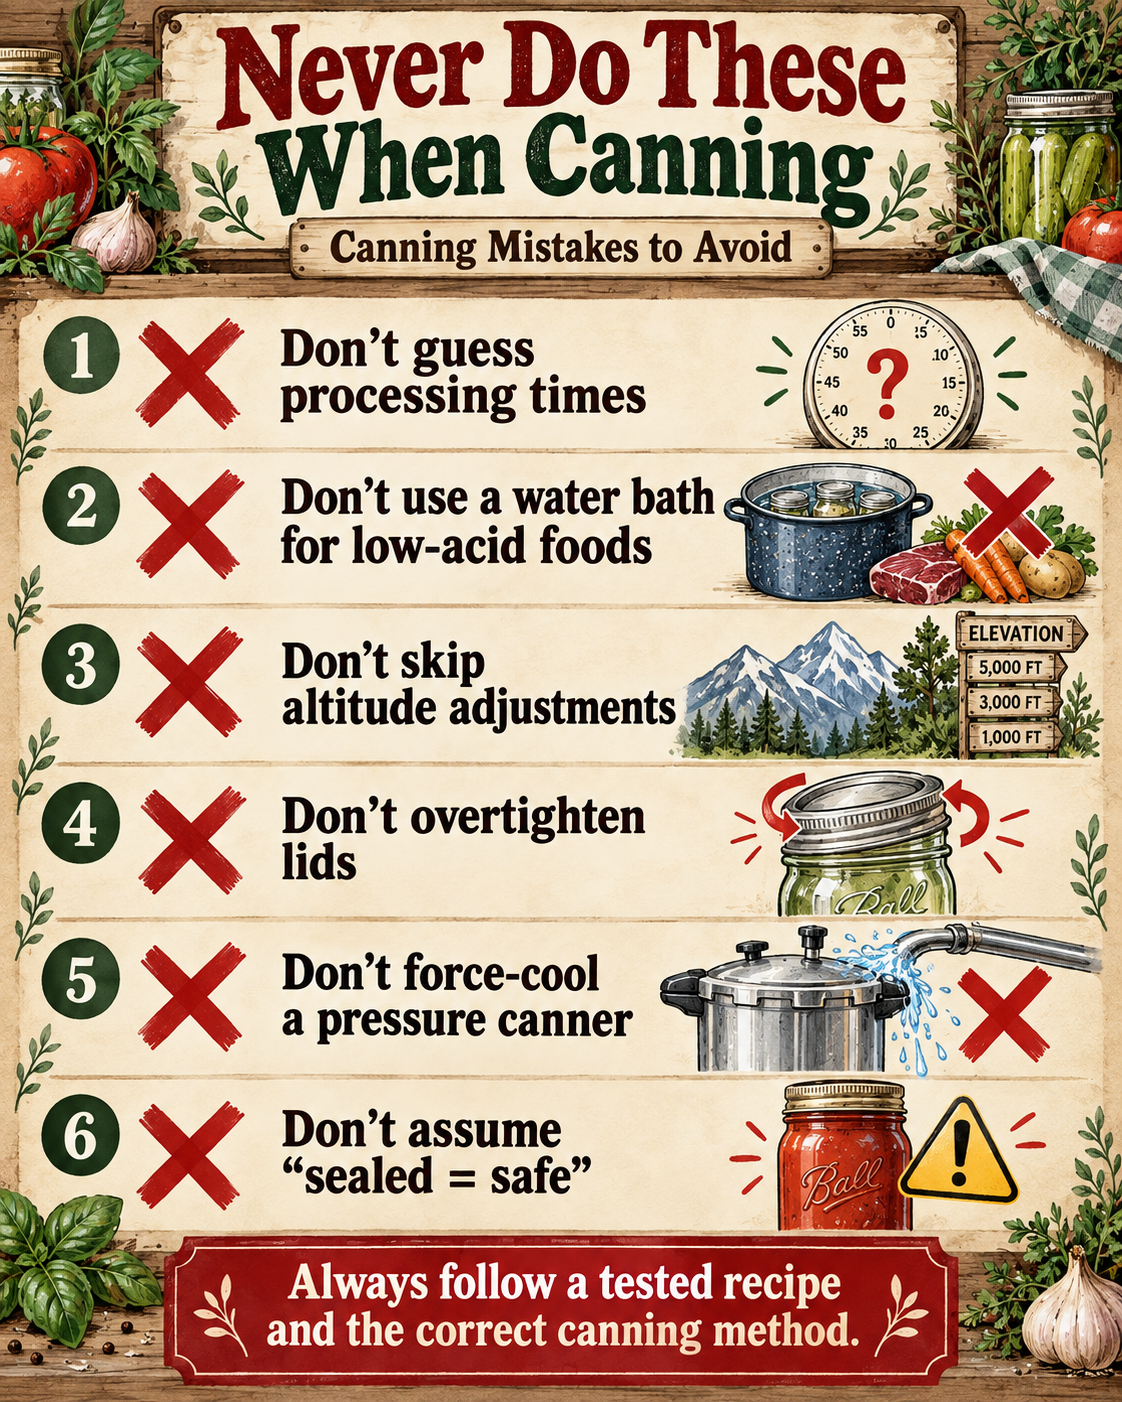
- Starting before reading the entire recipe.
- Using an untested blog, TikTok, Facebook, or old family recipe without verifying the processing method.
- Using the wrong canning method for the food.
- Forgetting altitude adjustments.
- Changing the jar size.
- Overfilling jars or ignoring headspace.
- Over-tightening screw bands.
- Skipping the 10-minute venting step on a pressure canner.
- Letting pressure fall below the required level without restarting the processing time.
- Force-cooling a pressure canner.
- Pressing lids while jars are cooling.
- Assuming a sealed jar equals a safely processed jar.
Beginner Canning FAQ
Can I water-bath can green beans?
Not as plain green beans. Plain green beans are a low-acid vegetable and require pressure canning using a tested recipe. Pickled green beans are different because a tested pickling recipe adds sufficient acid.
Can I pressure can everything instead of water-bath canning?
Do not assume a pressure canner automatically makes every recipe interchangeable. Use the processing method and schedule given by the tested recipe. For high-acid foods, a boiling-water canner is often simpler and faster.
Do I need to boil my lids before using them?
Follow the instructions from the lid manufacturer you are using. Lid preparation has changed over the years, so do not automatically copy what you remember someone doing decades ago.
Why did liquid come out of my jars?
This is called siphoning. Common causes include rapid pressure changes, incorrect headspace, tilting hot jars, or force-cooling a pressure canner. Do not open a properly sealed jar just to replace the liquid.
Can I add flour or cornstarch before canning soup or stew?
Only if a research-tested recipe specifically includes it. Standard USDA/NCHFP soup guidance does not allow flour or other thickeners, pasta, rice, milk, or cream. Add those ingredients after opening the jar.
Can I double a canning recipe?
That depends on the product. Some recipes, especially jams and jellies, do not perform properly when simply doubled. Follow the tested recipe’s batch-size instructions.
Can I reuse jars?
Yes, standard canning jars can generally be reused as long as they are free of cracks, chips, and damage.
Can I reuse flat metal lids?
Standard disposable flat canning lids should not be reused for another canning cycle. Screw bands can be reused if they are in good condition.
How long should home-canned food be stored?
For best quality, plan to use home-canned foods within about one year and store them in a cool, dry, dark place.
The Simplest Way to Think About Canning
Canning becomes much easier when you stop thinking of it as one giant skill and instead think of it as a repeatable sequence:
Choose a tested recipe → choose the correct canner → prepare the food → fill the jars correctly → process for the correct time and pressure → cool undisturbed → check seals → label and store.
That is the system.
The more you can, the more confident you will become with handling hot jars, reading your pressure gauge, measuring headspace, and timing batches. But the safest experienced canners are not the people who stop looking at directions. They are the people who become comfortable with the process while still respecting the tested recipe.
If your memories of canning are mostly watching your grandmother work in a steamy kitchen and wondering how she seemed to know exactly what to do, you can learn it too. Start with one batch. Follow the instructions. Let yourself be slow the first time.
And when you hear that first lid ping on the counter, you will understand why people get hooked on filling shelves with food they preserved themselves.
Trusted Home-Canning Resources
- National Center for Home Food Preservation — tested recipes, canning principles, food-specific directions, and FAQs.
- USDA Complete Guide to Home Canning — comprehensive science-based home-canning guidance.
- Using Boiling-Water Canners — step-by-step boiling-water instructions.
- Using Pressure Canners — step-by-step pressure-canning instructions.


Post your Comment About This Product