
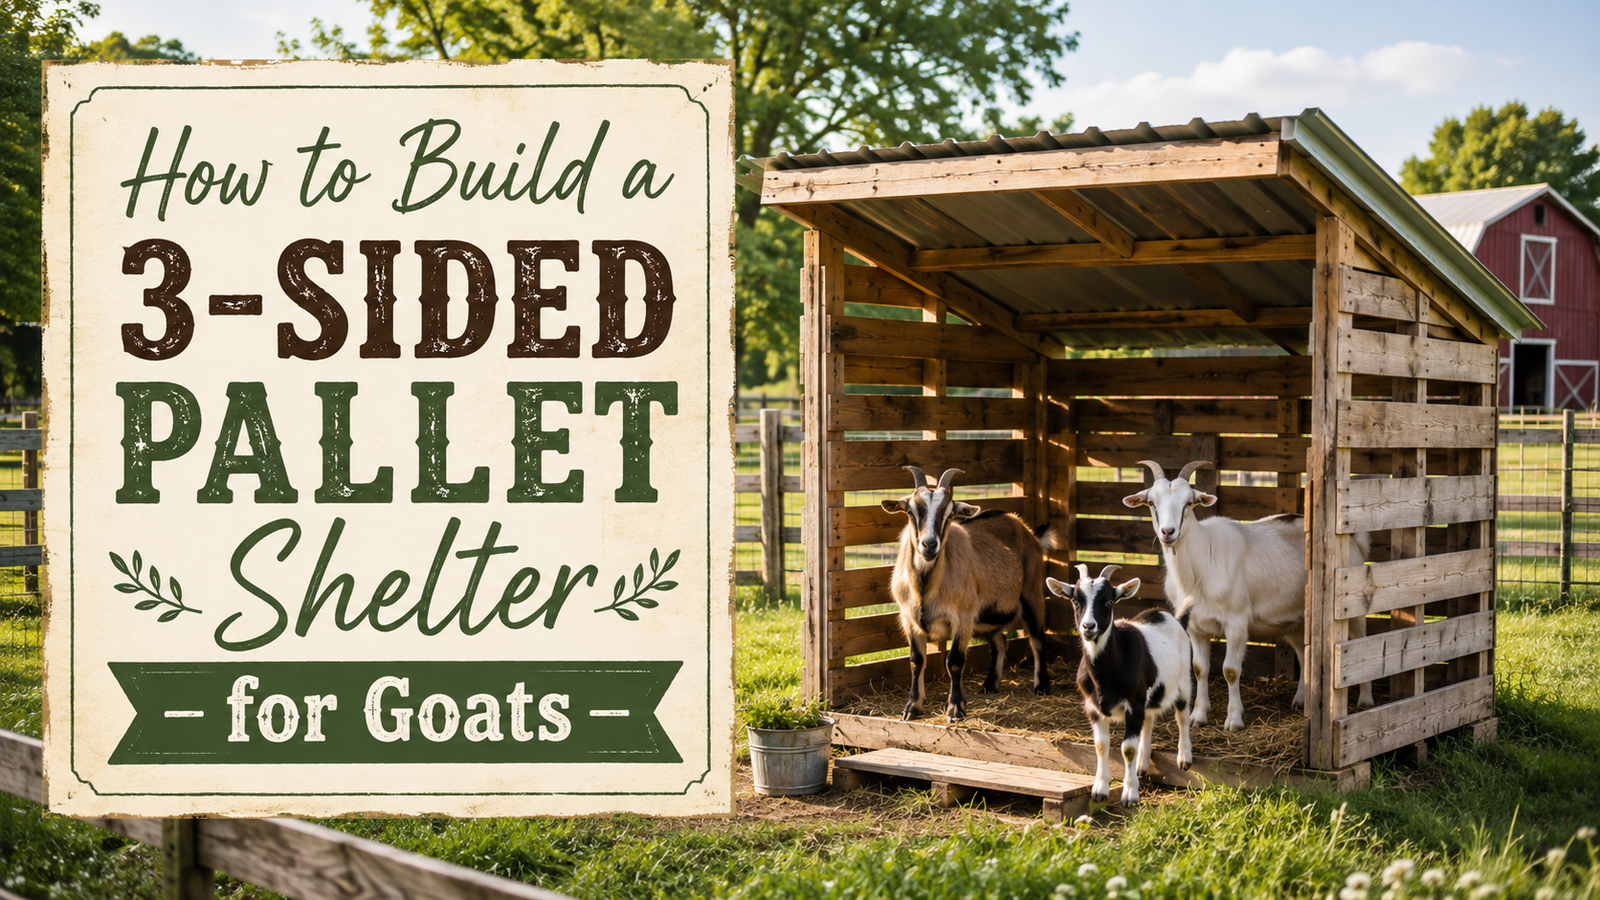
Goats have an impressive ability to ignore the expensive shelter you carefully prepared for them—and then squeeze underneath a wheelbarrow as soon as it starts raining.
Thankfully, goat housing does not have to be fancy.
A simple three-sided shelter can give your goats a dry place to sleep, protection from wind and rain, shade during hot weather, and somewhere comfortable to escape unpleasant conditions.
Pallets make this project especially affordable. They can form most of the shelter walls without requiring you to frame an entire building with new lumber.
However, a safe pallet goat shelter requires more than standing a few pallets in a U-shape and throwing a tarp over the top. Goats will lean against the walls, rub their horns on the boards, climb on anything nearby, and test every weak connection they can find.
This guide will show you how to build a sturdy, practical three-sided pallet shelter for a small herd.
Why Build a Three-Sided Goat Shelter?
Goats can tolerate cold temperatures surprisingly well when they are healthy, dry, and protected from strong winds.
Wet, windy weather is usually more of a problem than cold temperatures alone.
A three-sided shelter provides:
- Protection from rain and snow
- A wind-blocked sleeping area
- Shade during hot weather
- Natural ventilation
- Easy access for cleaning
- Multiple escape routes for lower-ranking goats
- An affordable alternative to a full barn
The open front allows moisture, ammonia, and stale air to escape.
The goal is not to create an airtight box. The goal is to create a dry, well-ventilated space where strong drafts do not blow directly across the goats while they are resting.
Internal link: Goats for Beginners: Everything You Need to Know Before Getting Goats
The Basic Pallet Shelter Design
This tutorial uses six standard wooden pallets to create a shelter measuring approximately 8 feet wide by 8 feet deep.
You will use:
- Two pallets across the back
- Two pallets along the left side
- Two pallets along the right side
- Four sturdy corner posts
- An open front
- A sloped metal roof
Pallet sizes are not completely standardized. Many common pallets measure approximately 48 by 40 inches, but you should measure every pallet before planning your shelter.
Try to use pallets that are approximately the same size. Matching pallets will make the walls easier to connect and the finished shelter more stable.
The pallets will form the lower section of each wall. Posts and additional lumber will extend above the pallets to support the roof and create enough headroom for cleaning.
Can You Build a Smaller Version?
For two Nigerian Dwarf or other miniature goats, you could build a smaller shelter using:
- Two pallets across the back
- One pallet on each side
- Four anchored corner posts
- A properly framed roof
This would create a shelter approximately 8 feet wide by 4 feet deep, depending on the pallet orientation.
Avoid making the shelter so small that one dominant goat can stand in the entrance and prevent the others from entering.
IMAGE IDEA 1: Add a simple overhead diagram showing two pallets across the back, two pallets along each side, the open front, and the direction of the roof slope.
How Large Should a Goat Shelter Be?
The ideal shelter size depends on your goats’ breed, size, horn status, personalities, climate, and the amount of time they will spend inside.
A practical starting point is approximately 10 to 15 square feet of sheltered resting space per adult goat. Larger breeds and goats kept inside for extended periods may need more.
An 8-by-8-foot shelter provides approximately 64 square feet of space.
It may comfortably accommodate:
- Two or three full-size adult goats
- Three or four miniature goats
- A doe with her kids
- A small group using it as an occasional pasture shelter
Square footage is not the only consideration.
A shelter can technically be large enough while still causing problems if the entrance is narrow or one dominant goat guards the opening. Horned goats may also need more room to move around safely.
In some herds, two smaller shelters work better than one large shelter because a dominant goat cannot guard both entrances at the same time.
How to Choose Safe Pallets
Do not automatically use the first free pallets you find behind a store.
Pallets may have carried chemicals, oils, cleaners, pesticides, automotive products, or other materials that you do not want around your goats.
Choose pallets that are:
- Clean and dry
- Structurally solid
- Free from oil or chemical stains
- Free from strong or unusual odors
- Not covered in peeling paint
- Not moldy or rotten
- Free from broken boards
- Obtained from a source that knows what they carried
Check the Pallet Stamp
Look for an IPPC stamp on the side of the pallet.
Pallets marked HT have been heat treated and are generally the best choice for livestock projects.
Avoid pallets marked MB. This means the pallet was treated with methyl bromide.
An HT stamp does not guarantee that a pallet remained clean after it was manufactured. You still need to know what the pallet transported and whether anything spilled on it.
Some domestic pallets may not have a stamp. Only use an unstamped pallet if you trust the source and know that it did not carry hazardous materials.
IMAGE IDEA 2: Add a close-up graphic comparing an HT pallet stamp with an MB pallet stamp. Label HT as “Choose” and MB as “Avoid.”
Materials You Will Need
Your exact material amounts will depend on your pallet measurements, roof design, and local snow and wind conditions.
Main Materials
- Six matching heat-treated pallets
- Four pressure-treated or rot-resistant 4-by-4 posts
- Exterior 2-by-4 lumber
- Appropriately sized roof rafters
- Corrugated metal roofing panels
- Exterior-rated structural screws
- Exterior screws for attaching boards
- Roofing screws with rubber washers
- Scrap boards, plywood, or siding
- Gravel or crushed stone
- Landscape fabric, optional
- Concrete or rated ground anchors
- Animal-safe exterior wood sealer, optional
Tools
- Cordless drill or impact driver
- Circular saw
- Tape measure
- Level
- Framing square
- Post-hole digger or auger
- Shovel
- Rake
- Hammer
- Pry bar
- Tin snips, if needed
- Work gloves
- Eye protection
- Hearing protection
Do not use drywall screws for structural connections. They can snap under pressure and are not designed for outdoor construction.
How to Build a 3-Sided Pallet Shelter for Goats
Step 1: Choose a Dry Location
The shelter should be built on high, well-drained ground.
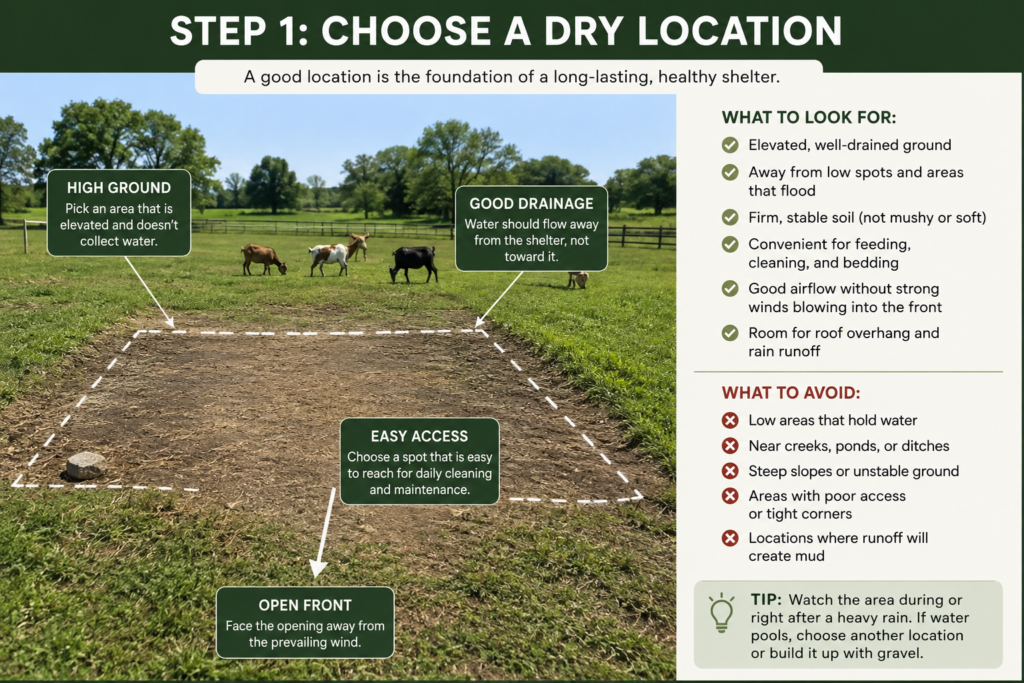
Even a perfectly constructed roof will not keep your goats dry if the shelter sits in a low area that collects water.
Choose a location that is:
- Naturally elevated
- Easy to reach for cleaning
- Accessible to every goat
- Away from standing water
- Far enough from the fence to prevent escapes
- Positioned where roof runoff will not create mud
Watch the area during or immediately after a heavy rain before choosing the final location.
If water pools there, select another location or build up the base with compacted gravel.
Step 2: Face the Opening Away From the Wind
Position the open side away from the strongest prevailing winter winds on your property.
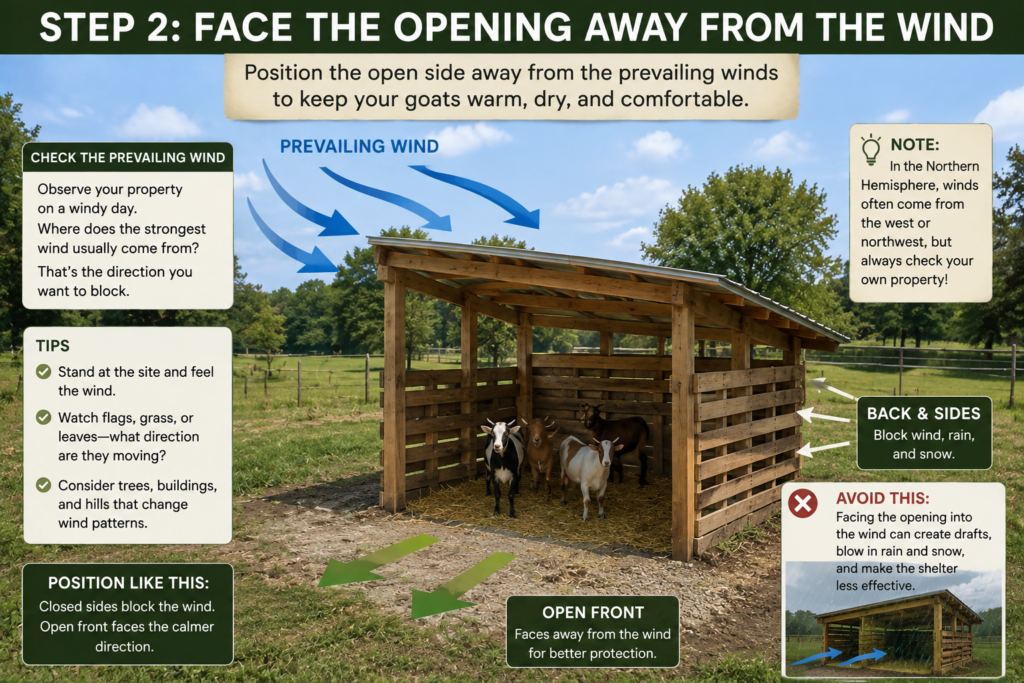
Do not rely only on a general recommendation such as facing the shelter south. Buildings, trees, hills, and valleys can change the way wind travels across your pasture.
Stand at the proposed location on a windy day and observe the direction the wind is coming from.
The back and side walls should block the worst weather rather than funneling it directly through the entrance.
Plan the roof slope so rain and melting snow run toward the back or sides instead of collecting in front of the opening.
Step 3: Prepare the Pallets
Inspect every pallet before construction.
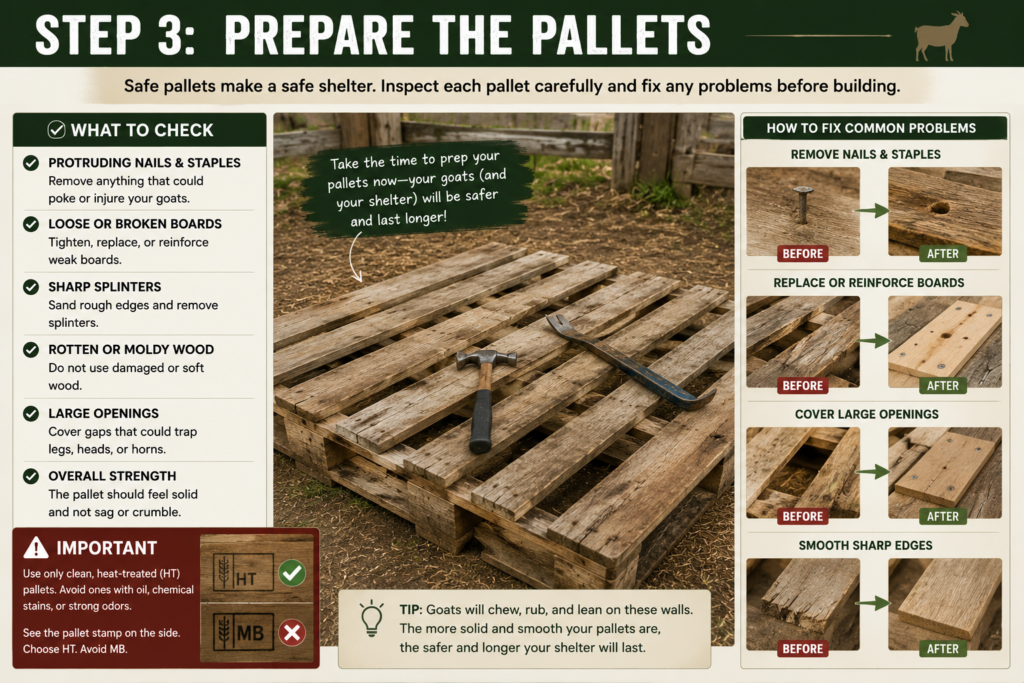
Remove or repair:
- Protruding nails
- Staples
- Broken boards
- Loose pieces
- Sharp splinters
- Rotten wood
- Damaged pallet blocks
Replace weak boards with sturdy scrap lumber.
Pay special attention to openings in the pallets. A goat may be able to trap a leg, head, collar, or horn in a space that appears harmless.
Cover dangerous openings with securely attached boards or solid sheathing.
Step 4: Prepare the Base
Mark an area slightly larger than the finished shelter.
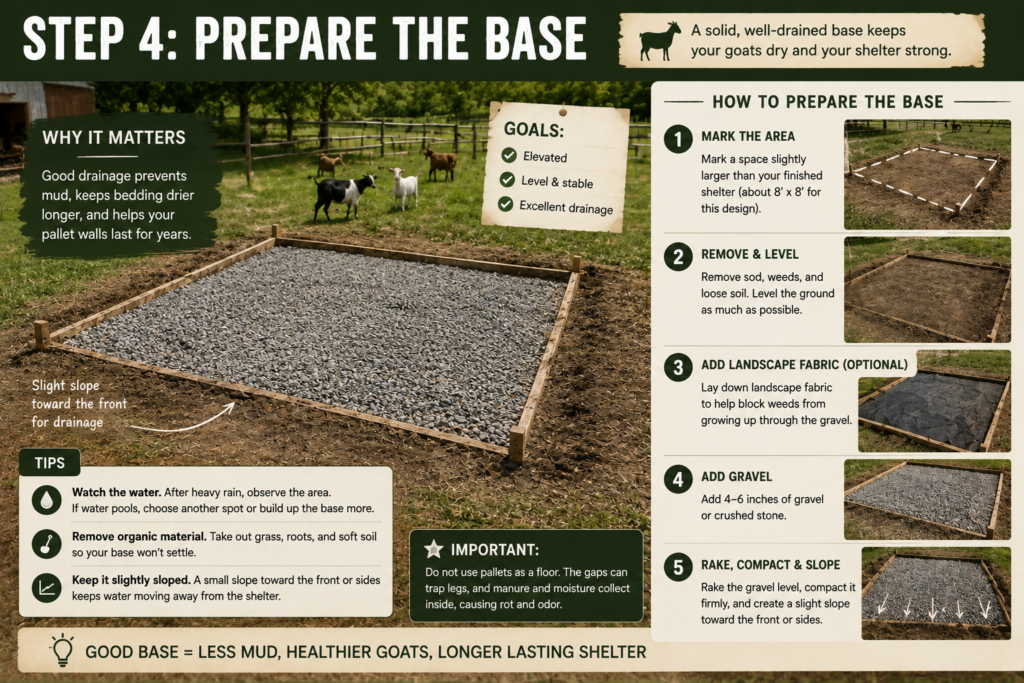
Remove sod, weeds, and loose organic material. Grade the area so water drains away from the structure.
For a more durable base:
- Lay landscape fabric over the soil, if desired.
- Add several inches of gravel or crushed stone.
- Rake the gravel level.
- Compact it firmly.
- Create a slight slope toward the entrance or another drainage area.
Do not use exposed pallets as the shelter floor.
Pallet openings can trap legs, and manure and bedding will collect inside the pallet where it is difficult to clean.
A compacted gravel or well-drained earthen floor covered with bedding is usually safer and easier to maintain.
Step 5: Lay Out the Pallets
Arrange the pallets on the prepared base before attaching anything.
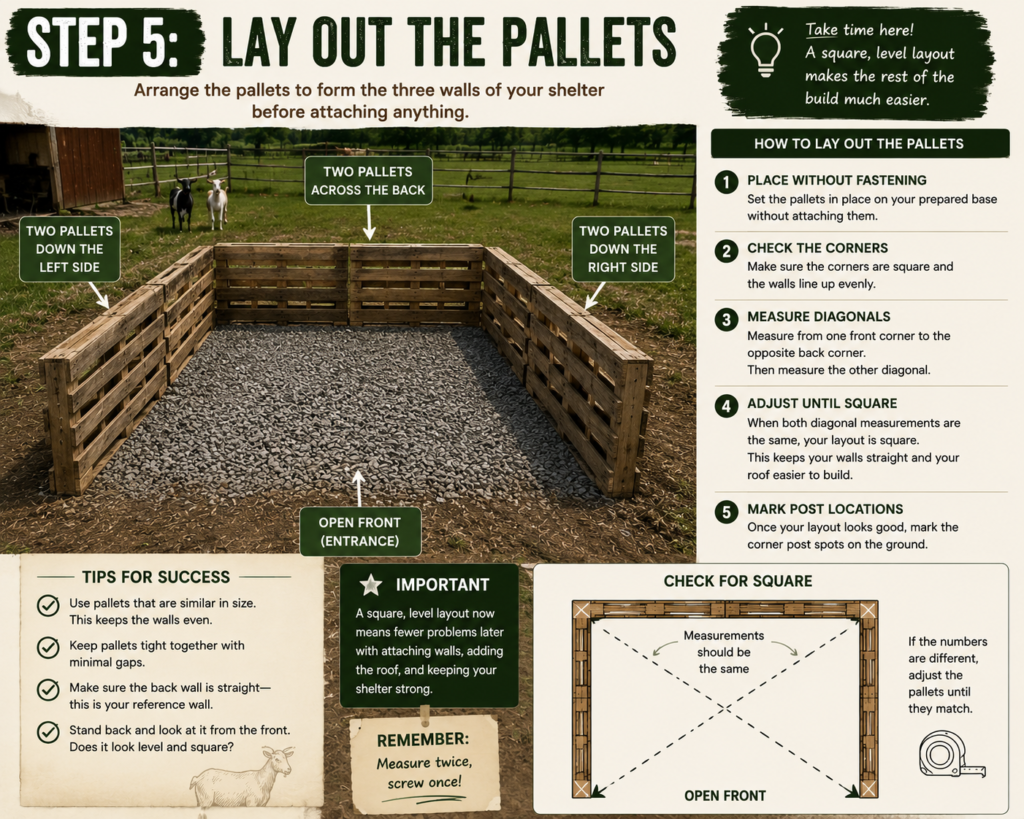
Place:
- Two pallets across the back
- Two pallets along the left side
- Two pallets along the right side
Check that the walls form square corners.
Measure diagonally from one front corner to the opposite back corner. Then measure the other diagonal. When both measurements are equal, the shelter footprint is square.
Mark the corner-post locations after confirming the layout.
Step 6: Install the Corner Posts
Install one post at each corner.
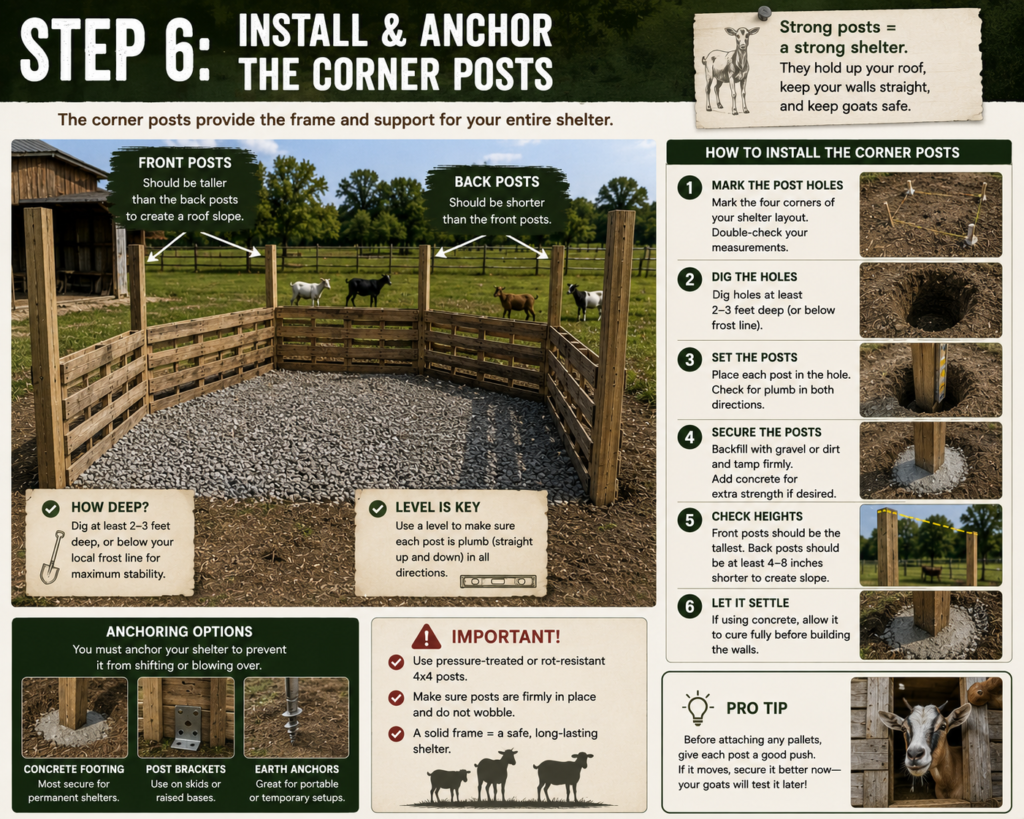
The two front posts should be taller than the back posts. This will create the slope needed for the roof.
The amount of roof slope required will depend on:
- The depth of the shelter
- Your roofing material
- Local snowfall
- The roofing manufacturer’s instructions
- Your desired entrance height
In areas with heavy snow, use roof rafters and spacing appropriate for the local snow load. A shelter roof that works in a mild climate may not be strong enough for a Western New York winter.
Permanent posts may need to extend below the local frost line.
A portable shelter can be built on skids, but it should still be secured with rated earth anchors or another dependable anchoring method.
A three-sided shelter can catch wind like a large box. The weight of the pallets alone is not enough to keep it secure during severe weather.
Step 7: Attach the Pallets
Place the pallets between or against the corner posts.
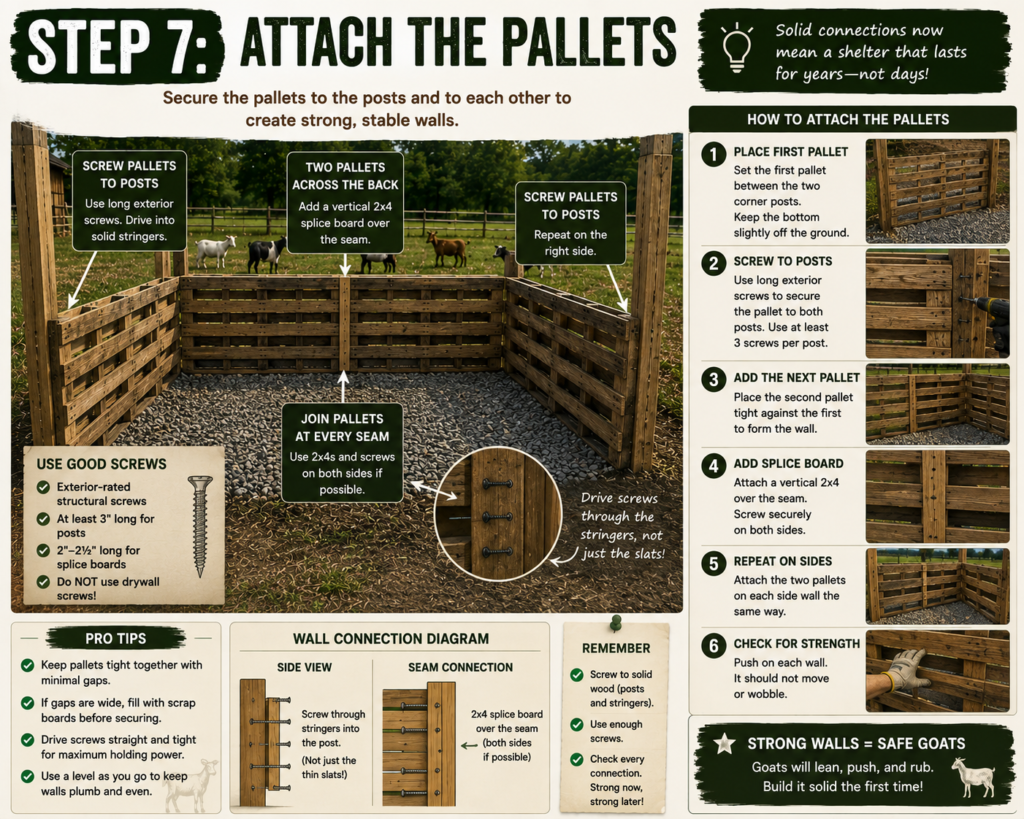
Secure each pallet to the posts with several exterior structural screws.
Drive the screws through solid pallet stringers rather than thin slats whenever possible.
Connect the two pallets on each wall by adding a vertical 2-by-4 board across the seam.
For additional strength, attach another board over the seam on the opposite side.
Push firmly against each wall after it is assembled. It should not sway, twist, or separate.
Step 8: Add Top Rails and Bracing
Install continuous top rails along the back and both side walls.
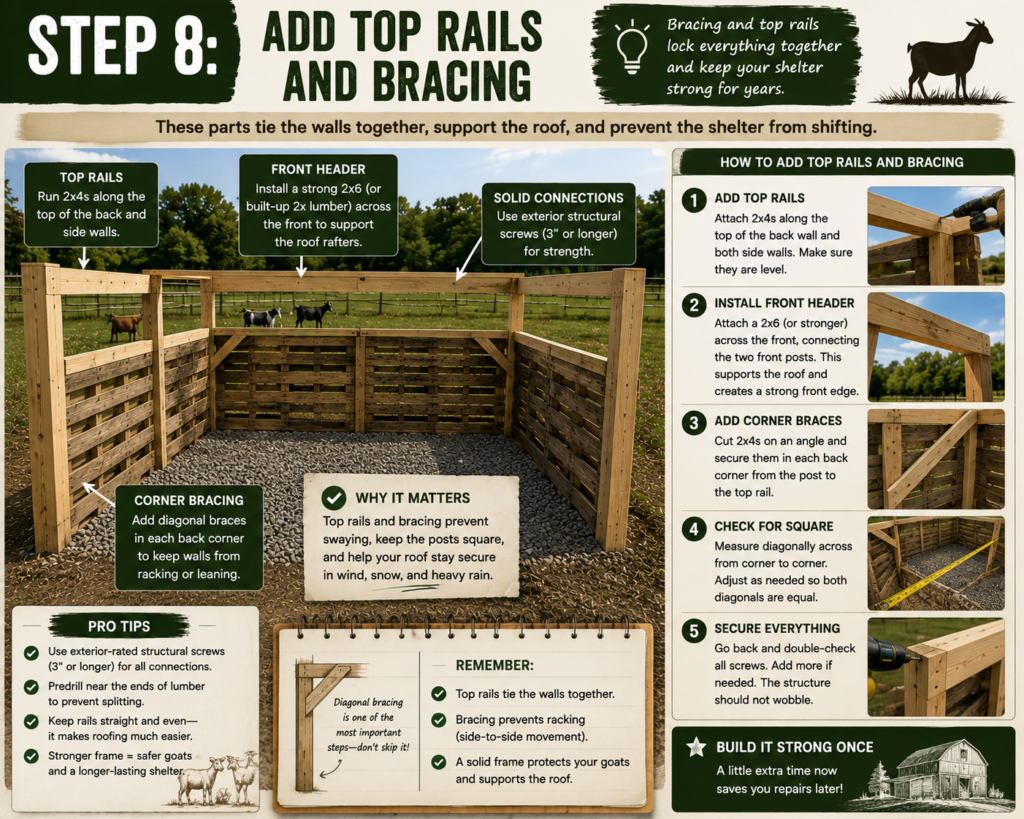
The top rails will:
- Connect the corner posts
- Stabilize the pallet walls
- Support the roof framing
- Reduce movement when goats rub against the shelter
Add diagonal braces at the corners.
Corner bracing is especially important on a three-sided structure because the open front does not provide a complete wall to prevent the building from shifting sideways.
Install a strong header across the front opening. The header will connect the front posts and support the rafters.
Step 9: Frame the Roof
Run rafters from the taller front header to the lower back wall.
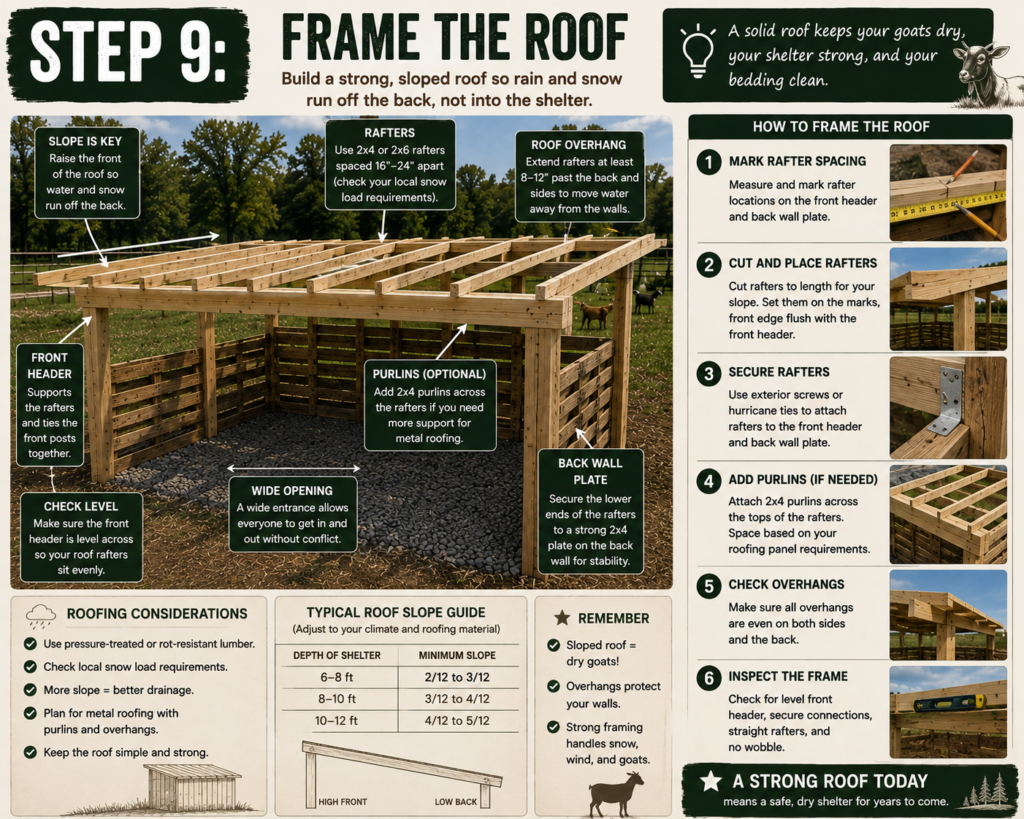
The proper rafter size and spacing will depend on:
- The shelter dimensions
- Local snow loads
- Lumber species and grade
- Roofing-panel requirements
Add roof purlins or horizontal supports if required for your metal panels.
Include roof overhangs whenever possible.
A front overhang will help stop rain from blowing through the entrance. Side and rear overhangs will move water away from the pallet walls.
Step 10: Install the Metal Roofing
Install the corrugated metal panels according to the manufacturer’s directions.
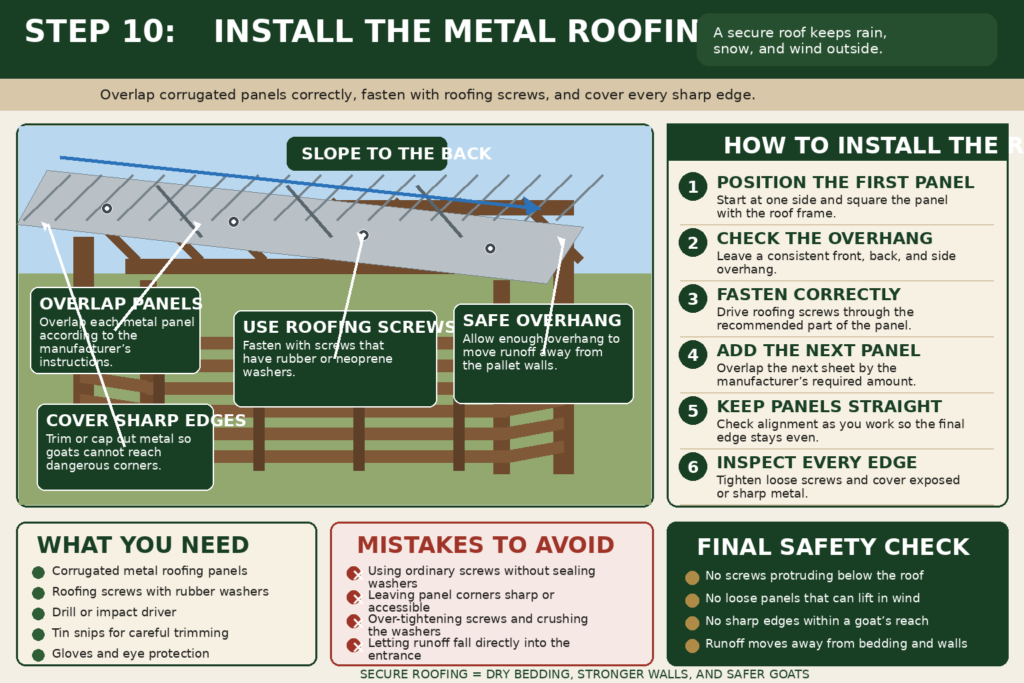
Use roofing screws with rubber washers and overlap the panels correctly.
Check carefully for:
- Exposed sharp corners
- Cut metal edges
- Screws protruding into the shelter
- Loose panels
- Areas goats could reach
Cover or trim sharp edges before allowing the goats inside.
A heavy-duty tarp may work as a temporary roof, but it is more likely to flap, tear, sag, or collect snow.
A properly supported metal roof is usually a better long-term choice.
Step 11: Cover Dangerous Pallet Openings
Cover large openings on the inside of the pallet walls using:
- Scrap boards
- Exterior plywood
- Board-and-batten siding
- Other smooth, securely attached material
Interior sheathing creates a flatter wall and reduces the risk of a goat becoming trapped.
Concentrate on openings:
- At goat-head height
- Near the floor
- Beside corner posts
- Around the roofline
- Large enough for a kid to climb through
- Wide enough to catch horns or collars
You do not need to make the shelter airtight.
Leave controlled ventilation near the top while blocking strong drafts at bedding level.
Step 12: Add Bedding and Inspect the Shelter
Cover the floor with clean straw, pine shavings, or your preferred livestock bedding.
Before allowing the goats inside, inspect the shelter from their perspective.
Look for:
- Protruding nails
- Exposed screws
- Sharp roofing edges
- Loose boards
- Entrapment openings
- Dangling wire
- Rope or baling twine
- Accessible plastic
- Unstable walls
- Climbing routes to the roof
- Water draining through the entrance
Shake the walls and push against the posts.
If you can easily move part of the structure with your hands, several goats may be able to loosen or dismantle it.
IMAGE IDEA 3: Add a finished shelter photo showing the gravel base, deep bedding, metal roof, wide entrance, and goats resting inside.
How to Winterize a Pallet Goat Shelter
A basic pallet shelter may need additional wind protection before winter.
Cover the Interior Walls
Attach solid boards or plywood over the inside of the pallets.
This will reduce drafts while allowing you to leave ventilation near the roofline.
Avoid using loose tarps or exposed plastic where goats can chew or pull on them.
Add Deep, Dry Bedding
Add a thick layer of clean bedding during cold weather.
Deep bedding can help insulate goats from the frozen ground, but it should not become wet or smell strongly of ammonia.
Replace saturated bedding whenever necessary.
Add a Partial Front Windbreak
In a windy location, add a short wall or half-pallet along one side of the entrance.
This can prevent wind from curling around the corner without completely closing the shelter.
Do not create such a narrow opening that a dominant goat can trap another goat inside.
Reinforce the Roof
Before snow season, inspect:
- Rafters
- Roof screws
- Fasteners
- Corner braces
- Posts
- Anchors
- Metal panels
Remove excessive snow accumulation when it is safe to do so.
Do not enter or stand beneath a shelter roof that appears bowed, cracked, or unstable.
Common Pallet Shelter Mistakes
Using Contaminated Pallets
Free pallets are not always safe pallets.
Do not use pallets that are oily, stained, heavily painted, moldy, or chemically treated.
Building in a Low Area
Poor drainage creates mud, wet bedding, hoof problems, and rotting walls.
Correct the drainage before building.
Leaving Pallet Openings Exposed
Young goats, horned goats, and goats wearing collars may become trapped.
Cover questionable openings with solid boards.
Using an Unsupported Tarp
A tarp stretched across an open space can collect rain or snow and collapse.
Even temporary roofing needs adequate framing.
Failing to Anchor the Shelter
The walls and roof create a large surface for the wind to push against.
Secure the building with posts, earth anchors, or another reliable anchoring system.
Making the Entrance Too Narrow
A narrow entrance allows a dominant goat to block lower-ranking herd members.
A wide front gives goats more room to enter, exit, and avoid conflict.
Placing Goat Toys Beside the Shelter
Spools, platforms, hay feeders, picnic tables, and other structures may give goats a step onto the roof.
Keep climbing structures away from the shelter unless the roof was specifically designed to support goats.
Internal link: 25 Homemade Goat Toys to Keep Your Goats Happy
Internal link: DIY Goat Playground Ideas
Maintaining Your Pallet Goat Shelter
Inspect the shelter at least once each season and after severe storms.
Check for:
- Loose screws
- Rotten wood
- Chewed boards
- Splinters
- Roof leaks
- Sagging rafters
- Shifting posts
- Loose anchors
- Sharp metal
- New entrapment gaps
- Wasp or hornet nests
Remove wet bedding and manure regularly.
Keep weeds and tall grass trimmed around the exterior so the wood can dry after rain.
Redirect roof runoff if puddles begin forming near the entrance.
Replace damaged pallet boards as soon as possible instead of waiting for an entire wall to weaken.
Frequently Asked Questions
How many pallets are needed for a three-sided goat shelter?
A very small shelter can be constructed with four pallets: two across the back and one on each side.
The larger design in this tutorial uses six pallets, with two forming each wall.
Keep one or two additional pallets available for replacement boards or a partial entrance wall.
Can goats stay in a three-sided shelter during winter?
Healthy goats can often use a properly constructed three-sided shelter during winter as long as it remains dry, blocks strong winds, and contains adequate bedding.
Very young kids, elderly goats, sick goats, and does kidding during severe weather may need access to a more enclosed building.
Should the open side face south?
A south-facing opening may receive additional winter sunlight, but protection from the prevailing wind is usually more important.
Observe the weather patterns on your property before choosing the direction of the entrance.
Should a pallet shelter have a wooden floor?
A wooden floor is optional, but it should be solid, sturdy, non-slip, and easy to clean.
Do not use exposed pallets as flooring.
A compacted gravel or well-drained dirt base with bedding is usually simpler for a basic pasture shelter.
Can goats climb onto the shelter roof?
They may try.
Keep feeders, platforms, spools, and other climbing objects away from the shelter walls.
Do not allow goats onto the roof unless the shelter was specifically engineered to support their weight. I have specifically created my own pallet playground that the goats can climb on- and you could do the same for your shelter. They love climbing on things just as much as they love staying dry (well… almost… I think staying dry beats playing…)
Is a pallet shelter predator-proof?
No.
A three-sided shelter provides weather protection, but it will not necessarily protect goats from loose dogs, coyotes, or other predators.
Secure fencing, nighttime housing, guardian animals, or other predator-control measures may still be needed.
Final Thoughts
A three-sided pallet shelter can be one of the most useful low-cost projects you build for your goats.
The pallets reduce the amount of new lumber required, but the construction details determine whether the finished shelter is safe and durable.
Remember to:
- Start with clean, solid pallets.
- Build on dry, well-drained ground.
- Face the entrance away from harsh winds.
- Anchor the structure securely.
- Frame the roof for your local weather.
- Cover dangerous pallet openings.
- Give every goat enough room to enter and rest.
The finished shelter may not look like an expensive custom barn.
Your goats will not care.
They will be too busy rubbing against the walls, rearranging the bedding, and arguing over who gets the driest corner.
Keep Building Your Goat Setup
Read these next:
- 25 DIY Goat Shelter Ideas for Every Budget
- DIY Pallet Goat Playground Ideas
- Homemade Goat Toys to Keep Your Goats Happy
- Goats for Beginners: Everything You Need to Know
- Goat Fencing Options for Small Homesteads


Post your Comment About This Product